Welcome to Day 2 of the Swoon Eloise Wallet Sewalong.
Today we are completing the Trifold Lining.
Below are pictures and written instructions for making the Trifold pleats.
But here is also a link for a video on how to make the pleats.
Making the Pleats Video
1. Take your Trifold Pleat panel, lay it horizontally, wrong side up.
Starting on the left side, mark 4" over.
(I marked the top and the bottom or you can draw a vertical line down)
From your 4" mark, make another indication at 6.5" followed by 3 more 6.5" markings.
1. Take your Trifold Pleat panel, lay it horizontally, wrong side up.
Starting on the left side, mark 4" over.
(I marked the top and the bottom or you can draw a vertical line down)
From your 4" mark, make another indication at 6.5" followed by 3 more 6.5" markings.

2. Starting at your 4" mark, fold on the line, wrong sides together. Press well.


Do the same for your 4-6.5" marks.
See the following 4 photos.
See the following 4 photos.


Top stitch each crease you pressed. Be careful to only stitch through the fold and not get any more fabric caught up in it!

Different angle for how to top stitch your folds.

After top stitching, your pleat panel will look like this.

Let's gather up those pleats.
Start with the 4"fold, bring up the first 6.5" fold and place that fold 1/2" above the 4" fold.

Pin together.

Repeat with the next 6.5". Pull it up 1/2" above your previous pleat.

Pin.

Repeat for the other pleats. You will be left with a long tail.
Pull the tail up so that it is 1.5" above the highest pleat.

Pin well.

Your finished pleat panel will be 7.5" x 7.5".

Baste down each side of your pleat panel at 1/4".
I like to sew from bottom to top. I find that it helps keep the pleats from shifting.
Which ever direction you choose, make sure to sew both sides in the same direction to prevent twisting.

Now we need to cut this panel in half.
Fold the panel in half. I marked and drew a line.

Cut along your crease/line.


Baste at 1/4" along your cut lines on both panels.

Grab a card and test out your slots.

Right sides together, pin one of the trifold pleats to a trifold pleated panel.
Sew down the right side with 1/2" seam allowance.

Trim your seam.

Fold the backing behind the pleats so they are wrong sides together.
Press well.

Edge stitch along the folded side only (right side).
Baste around the other 3 sides.

Take the Trifold Lining Panel.
Place the pleat we just finished on the left side, matching raw edges.
Your pleats will be up.
Pin well. Baste at 1/4" SA around 3 three raw edges only.


Flip your piece over. Trim the two corners of the pleat to match the curves of your lining piece.


Now we will add the second pleated panel.
Fold your lining in half, matching short sides.
Mark the center on top and bottom.

Take your second trifold pleated panel.
According to the real instructions, fold each long raw edge under 1/2. Mark the center of the
panel on the two short ends. Match your marks on the panel with the lining piece.
Top stitch down both long ends that are folded under.
I decided to try something new.
I made a second pleat backing piece.
Sew right sides together down both long ends.

Trim your SA down .

Turn right side out and get ready to press well.

Have your iron throw up on your beautiful pleats.

Try to shout wipe the stain out. That won't work, so throw it in the wash with your towels.
Have it come out even worse since you didn't pre-wash your fabric.

Go cry on your pillow and have you husband worry about your sanity.

Finally get your shit together and realize life and the sewalong must continue.
Mark the center of your second trifold pleat and match with the lining piece we marked earlier.

Pin well. Laugh at my pleats, it's ok.

Top stitch down each long end.

Sob!

Install the male half of the magnetic snap.
Now on your empty end of the lining piece (the right side of the photo above)
Make a mark in the center.

Measure up 1.25" up from the raw edge. Mark.

Grab your male half (the one with the pop up), the snap backing, and
whatever tool you use to cut the fabric. I like to use an Xacto knife.
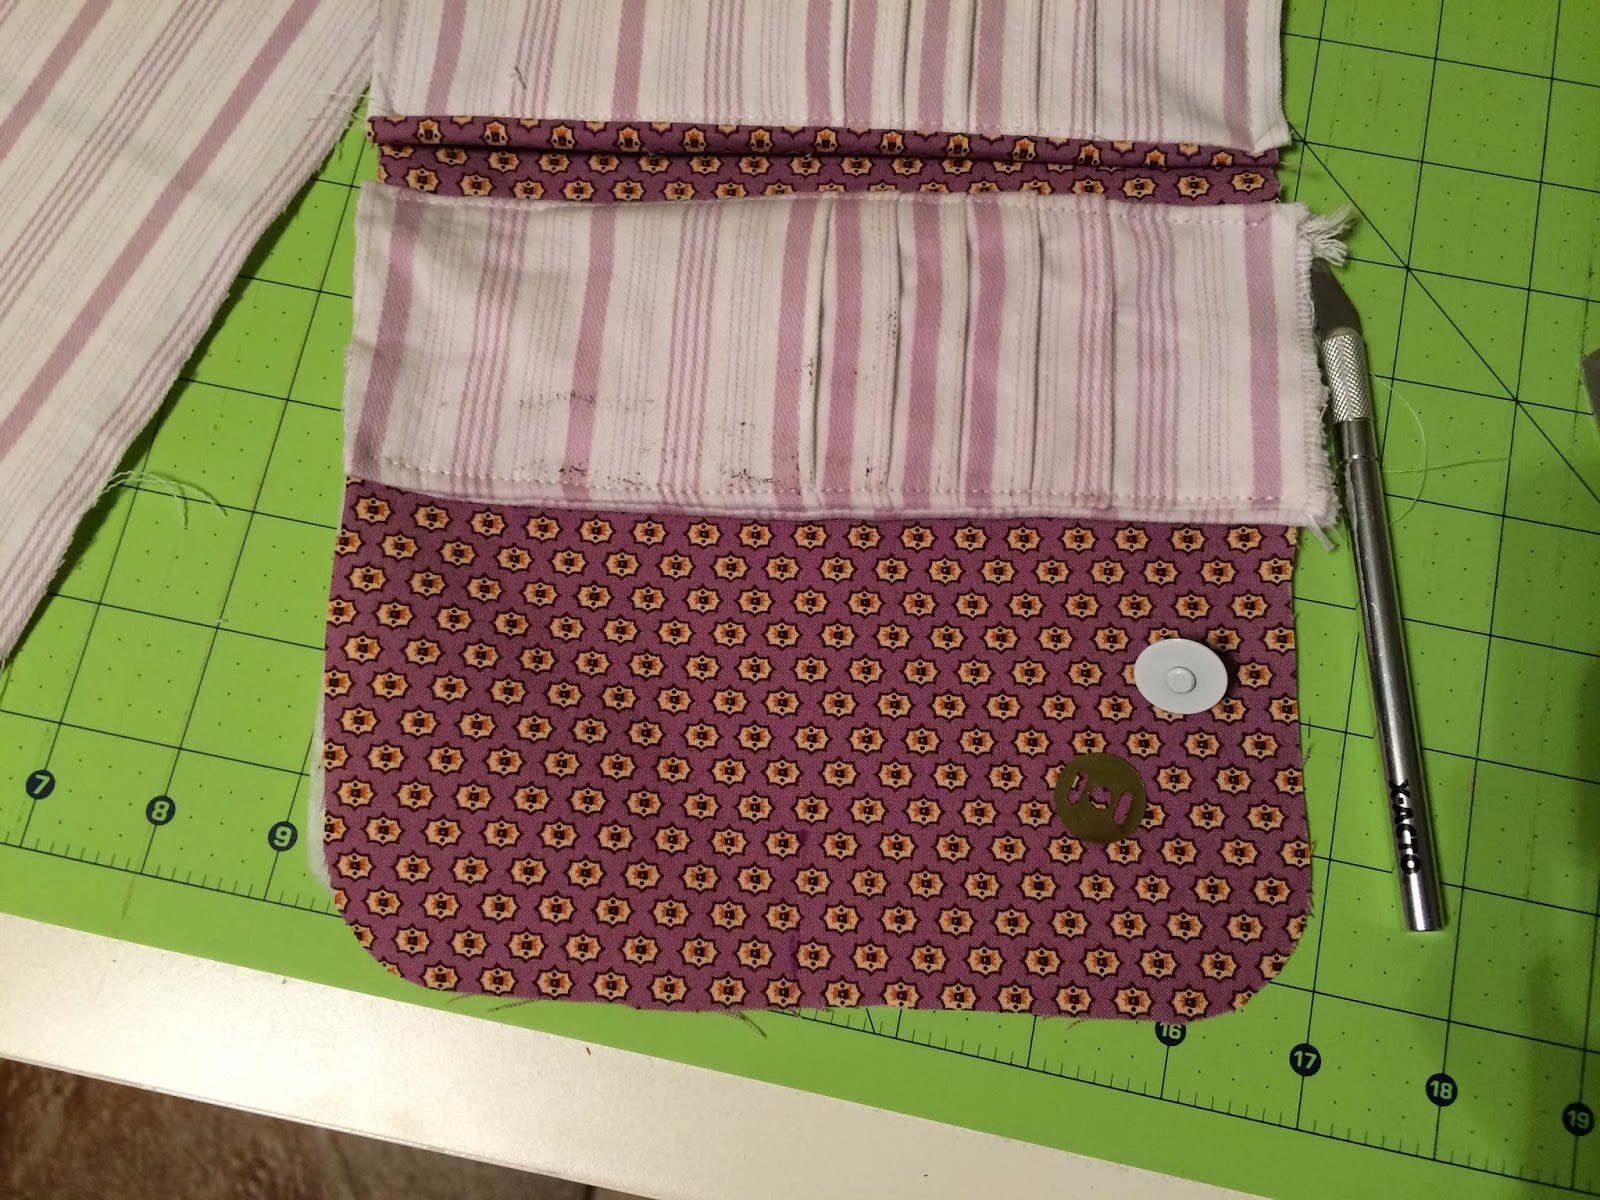
Place the snap back, center the middle circle right over your 1.25" mark.

Using your tool of choice, cut the two side slits on the magnetic backing piece.
Do not cut in the center hole.


On the right side of your fabric, insert the male half through the two little slits you cut.
On the wrong side, slide the magnetic back piece over the arms. Fold the arms towards the center, over lapping each other.

Congratulations! Your Trifold compartment lining is complete.
Come back tomorrow to finish the trifold compartment and install your main compartment zipper.
No comments:
Post a Comment